Using Fonts in the Design Editor
To add text to your design, and to view and manage fonts, you will click on the Fonts tab.

Corjl provides hundreds of Starter Fonts free for both commercial and non-commercial use. These fonts are visible in the font preview window of the tab.
🖋️ Adding Text to the Canvas
To add a text box/text to the design canvas, double-click the font name you want to use or drag and drop the name of the font onto the canvas.

🔼 Uploading Fonts
You can add your own fonts to the Fonts tab area by clicking on the Upload Fonts button at the top of the Fonts panel.

Upload fonts up to 30 fonts at a time using the formats TTF, OTF, or WOFF. You can also upload fonts contained in a Zip File. Just drag and drop the Zip File into the upload area.
Due to copyright laws, you are not able to rename fonts that you have uploaded into Corjl.
🔍 Viewing Fonts
Uploaded fonts will appear in the Fonts List viewing area in the lower part of the Fonts panel. You can search for a specific font using the search field, or you can expand the Categories (Tags, Collections, or Folders) below the search field and select a specific category group of fonts to display as well.
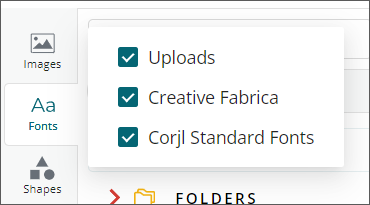
Once you have uploaded your own fonts, you can filter between the Corjl Standard Fonts and your uploads (and Creative Fabrica subscription fonts, if applicable) by hovering over the All Fonts button.
Select or deselect the options to filter the images in the viewing window.
Please note: Renaming, deleting, tagging, and adding fonts to collections or folders can all be done in the Assets area.
➕ Adding Multiple Fonts to the Design
There are two ways to add multiple fonts to a design. Each of these options will make those fonts available for both the designer and customers editing the design.
-
Quick Add Version - Click once on the name of a font in the Fonts List. This will highlight the font in blue and automatically make the font available for use in the Design.
It will also add the font to the Design Assets Fonts area in the "Individual" category section to make that font available for your customers to use when they edit the design.
-
Add Using Categories (recommended) - It is highly recommended that instead of adding fonts individually to a design, you add that font to a Category (tag, folder or collection) first and then add that Category to the design instead.
This will allow you to add and remove bulk fonts from multiple designs quickly and easily. To learn more about how to do this, read our article here.
❌ Removing Fonts From A Design
You can remove fonts in two ways:
-
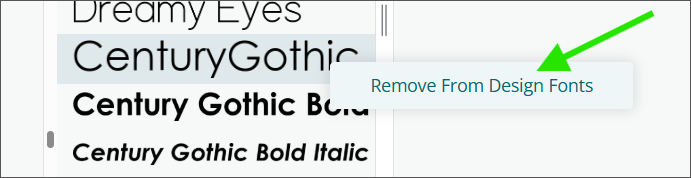
Individually Added Fonts - Fonts that have been added individually and are not a part of a synced Category can be removed in this way: right-click on the name of the font in the Fonts List in the Editor and select Remove From Design Fonts
- Fonts Added Using a Category - Fonts that have been added to the design by syncing a Category in the Design Assets list can only be removed from the design by also removing the font from that Category in the Assets area.
