
Data Merge Tool
Corjl has a powerful new tool called Data Merge to help your customers quickly add information to text fields on multiple pages of a design. Customers will be able to upload a CSV spreadsheet containing their information and have that information automatically populated in text boxes in the design.
This feature is perfect for designs such as:
- Place Cards
- Addressed Envelopes
- Table Numbers
- Certificates
And countless other designs where customers need to add similar repetitive information!
🛠️ Setting Up Your Designs for Data Merge
Follow these steps below to correctly set your designs up so Customers can use this tool:
Step 1: Create Your Design
Create your design and add the text box(es) that your customers can use to replace with their information.
For example, if your design is for a place card, add a text box with the desired font that says "Guest Name."

Step 2: Open Data Merge Tool
Click on the Data Merge option in the left menu area to open the Data Merge panel.

Step 3: Add a Field Name
Add a name for the type of information that the customer will be adding to the text box on the design. This name should let your customers know what information is expected to be added to that text box.
You can add a field name in two ways:
-
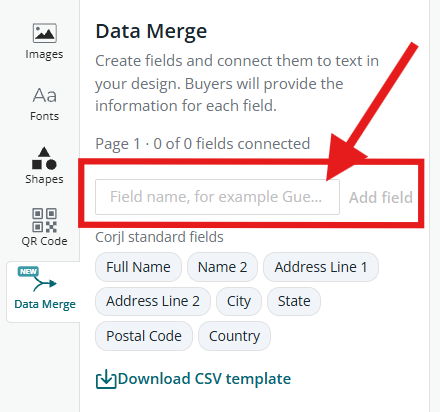
Type the desired Field name in the given text field.
For example, in a place card design you can name your Field "Guest Names" by typing that in the text field.
-
Select an option from common Field Names provided in the Corjl standard fields area.
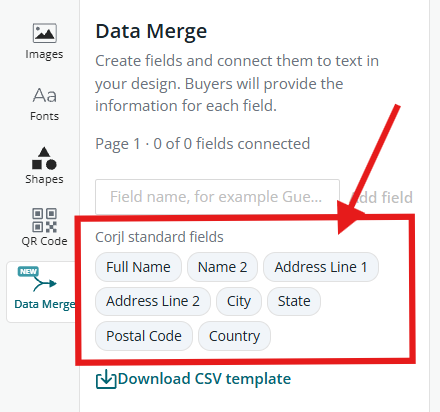
When you have entered in the Field Name you want, click where it says Add field. You will now see your newly name Field.
💡Pro tip: If you have more than one text box where customers will enter in information, you may create multiple named Fields by repeating this process.
Step 4: Assign a Text Box
Now that you have named your Field, you will want to assign it to a text box that is on the canvas of the design.
-
Click on the small arrow in the text field below the newly created Field Name where it says Select to assign a text box.
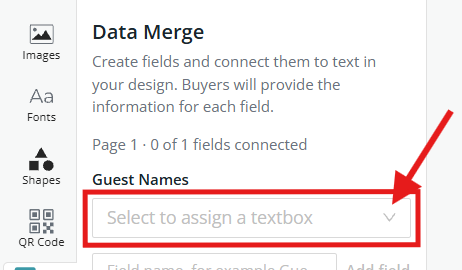
- You will see the wording added in the text box (or boxes) that are on the design canvas. Click the text box option you want to be filled by the information from that Field.

You will now see the assigned text box listed below the Field Name.

Additional Tips for Assigning a Text Box
- Click the "X" to remove the text box assignment.
- To assign that same Field information to a second text box, click where it says + Connect another text and choose a second text box from the canvas.