Organization Settings


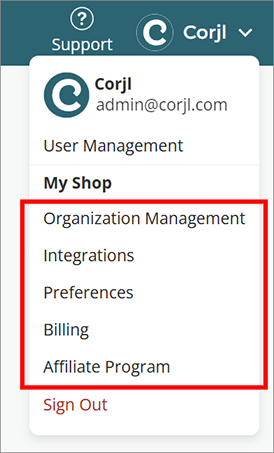
You can find the settings for each of your Organizations by going to the Settings drop-down menu in the upper right of the screen. The Organization settings are listed below the Organization name. These settings apply only to the Organization that you are currently viewing.

Use the drop-down menu in the top upper left corner of the Corjl app to switch between different Organizations. (The logo for the active Organization will show in that area once selected.)

We will discuss the options for each of these categories in the information below.

General

You can manage your Organization name, email, and logo in this section here.

Organization Email Address – If you have an email address for this organization that is different from your main Corjl Account, you may enter and update it here. Click in the email address field and type in the new email address. The change will save automatically.

Please note: Corjl communication emails such as “Proof Approved” notifications and billing emails will go to the Organization email address by default.

Organization Logo – You can also add your logo for your Organization here. To change the logo, click where it says Change Logo and then select the image to upload. Please note the optimal size for a logo image is 825 x 290 pixels.

Integrations

You will connect Corjl to your chosen marketplace here. To connect a marketplace, click the Add Marketplace button.

Follow the steps below to connect to each marketplace:

  • Etsy – On the Add Marketplace window, select the Etsy option from the drop-down list. Click the Connect button and follow the steps to add Corjl to your Etsy Integrations.
  • Shopify – Shopify will connect to your Corjl account using Webhooks. This is a way to notify Corjl that a certain event has occurred (usually a transaction) so Corjl will automatically send out the order email to your customer. When you select the Shopify option on the Add Marketplace window, you will be given the steps you need to follow to connect your Shopify account to Corjl using webhooks. If you have any difficulty with this process or questions, please contact Corjl Support.
  • WooCommerce – When you select WooCommerce in the Add Marketplace window, you will be asked to enter in your WooCommerce website URL address. Please make sure to include the “http” or “https” in the URL address you add here. Once the address has been added, click the Connect button.

Design Defaults

Your Global Design Settings area is where you can configure default settings for individual designs.

Please note: Some of these features are now connected to existing/previous designs as well as newly created designs using our Global Inheritance feature. Please read about that feature on the Global Inheritance page before making changes in this area.

There are three categories with features you can update in the Global Design Settings area. Each is listed below:

  • Protections Options – These options relate to what the customer can and cannot do while editing the design. These options relate to what the customer can and cannot do while editing the design. You will find matching settings in the Design Protections area for a design. The settings here will be the default settings for new designs created in your account.
  • Canvas Settings – Newly created designs will have these specifications by default (you can change them manually at the time of design creation). The Canvas Background options relate to what you will see on the canvas when it is set to Transparent or None.

To learn more about the specific function of each option, please see the Design Protections and Design Settings pages for more information.


Listing Defaults

Your Global Listing Settings is where you can assign default Instructions for your Demos and Listings, set a few Listing specific settings, and enable Prints of Love printing for your account.

Please note: Some of these features are now connected to existing/previous designs as well as newly created designs using our Global Inheritance feature. Please read about that feature on the Global Inheritance page before making changes in this area.

Default Instructions – Designate the Instructions you want automatically included in your Corjl Listings here. Click in the Design Name fields where it says Select design to locate and add your instructions design(s).

There are separate areas for Demo Instructions and Order Instructions so that you can have different sets of instructions for your Demos and Orders if wanted.

Download Options – These options affect the way the customer can download their edited designs, including the download file formats offered, and whether the customer will download the design or the designer will download and process the order for them. You can also set the default page size for PDF downloads in the Print Size section.

The settings here will be applied by default to all designs in a new Corjl Listing. You can change these settings for individual designs after the Listing has been created.


Other Options – There are two setting options found in the Listings area on this page:

  • Buy Now Button – The Buy Now button is a great way to encourage a sale straight from your Demo page. When selected, this option will display a Buy Now button at the top of the page of your Design Demo pages. When customers click on the button, first they will be asked if they want to save any changes made to the Demo design. If yes, they are asked to either log into Corjl or create an account so that their edits in the Demo may be saved. Then they are taken to the marketplace listing page where they can purchase the design listing. If they opt to not save their changes, they are taken directly to the marketplace listing without having to log in or create an account.
  • Listing Expiration Date – You can set a default expiration period for your orders with this option. To set a time period, click on the Expiration drop-down box and select a length of time the customer has before access to the order expires.

Affiliate Account Options – This area allows you to enable the Prints of Love print option and/or the Paperless Post electronic invite option to show when customers click on the Export button in their orders.

  • Prints of Love – If you have a Prints of Love affiliate account, your customers will then be able to download their design and go to the Prints of Love website to order prints. The feature is not attached to your affiliate account unless you paste in your Prints of Love link in the Enter your Prints of Love partner referral link area.
  • Paperless Post – Enable this option for customers to be able to share their invitations electronically.

Watermark

You can find the options to add watermarks to your designs in Demos here. The two watermark options given in this section are described below:

Overlay Watermark – This watermark will cover your entire design in your Demo pages.

  • Show Overlay Watermark – Enable this option to use the default Corjl watermark image in your Demos.
  • Use Custom Overlay Watermark – If you would like to use a custom watermark image, select this option and use the Upload Images button to upload your custom watermark image. Please follow the size restrictions when creating your own watermark, as well as setting the desired opacity before you upload the image.

Image Watermark – This option provides an extra layer of protection to images in a design. You can apply the watermark image here to individual images on the Manage tab found in the image’s Details page.


Category Management

This section allows you to manage aspects of your organizational Categories.

Choose Your Categories – On the main page of the Category Management section, you can enable the category options you would like to use in your account. To enable or disable a particular category (Folders, Collections, or Tags) click the On/Off toggle next to that category. Turning off a category will not delete the created folders/collections/tags for that category – they will still be available should you choose to turn the category back on at a later time.

Tag Manager – Use this area to manage your tags. On this page you can edit, delete, or merge existing tags in your account. To edit your tags, first select the type of item for which you want to edit the tags from the first drop-down box. You can choose from Designs, Fonts, Images, or Listings. This will display all the tags available for that group (you can use the buttons in the upper right of the screen to display the tags in either a Grid View or List View).

Next, select one or more tags by clicking once on the tag name and use the icon buttons shown in the image below to perform the following actions:

  • Edit Tag Name – To edit the name of a single tag, find and click on that tag in the list of displayed tags, then click on the “pencil” icon button at the top of the page. You can type in the new tag name in the text field that appears above the tag list. Please note that you can only edit one tag name at a time. If you select more than one tag then the Merge Tags option will show instead.
  • Merge Tags – You can merge multiple tags into a new tag name with this option. Select two or more tags, then type in the new tag name in the Merge Tag Name field. The new tag name must be unique. Please be aware that merging tags will eliminate the existing tags you are merging. All items will be combined into the new tag name.
  • Delete Tags – You can delete one or more tags with this option. Select one or more tags by clicking on the tag names, then click the “trash can” icon button.

Billing

View your Billing History and manage your payment method in this area. Each Organization will have its own billing section, charges, and method of payment.

Did this answer your question? Thanks for the feedback There was a problem submitting your feedback. Please try again later.